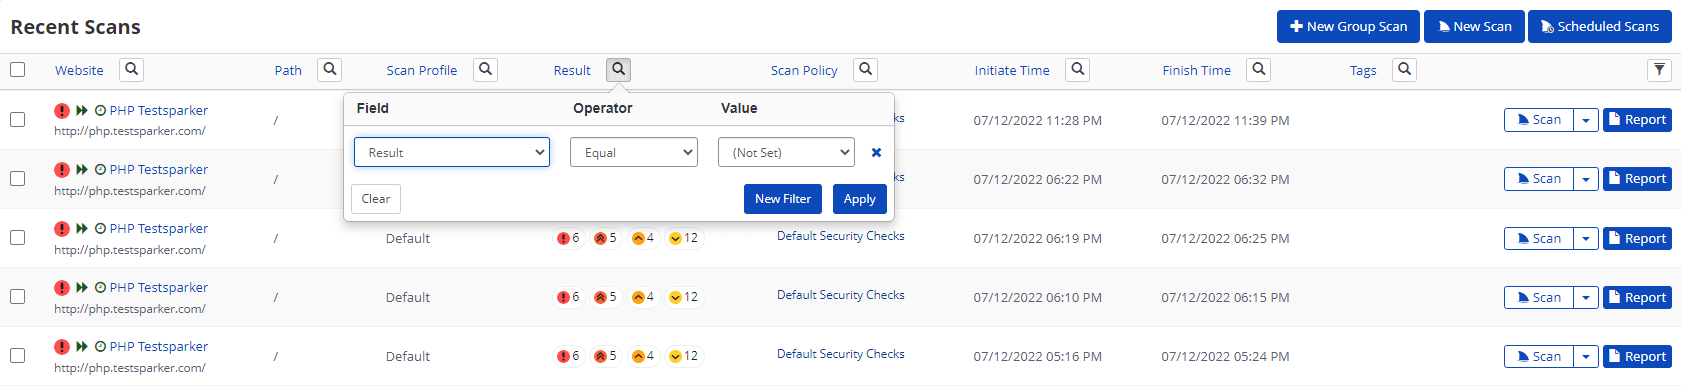
Recent Scans
Recent Scans is a page on Invicti Enterprise that displays scans initiated by the scanner whatever their scan status is.
(In Invicti Standard, recently completed scans are accessible from the File menu instead.)
- You can filter the Recent Scans list using multiple filters and use more than one per column (see Column Filters).
- If the column has been filtered, the magnifier icon on the column displays in gray.

Recent Scans Columns
This table lists the columns displayed in the Recent Scans window. All can be filtered.
|
Column |
Description |
|
Website |
This column lists the website name and address or the domain part of the target URL for which the scan was initiated. |
|
Path |
This column lists the path. If the path does not contain a value, this column contains a forward slash (/) only. |
|
Scan Profile |
This column lists the name of the scan profile used to scan the target website. Scan Profiles enable you to save scan settings for future scans. Scan Profiles can be reconfigured at any time. |
|
Result |
This column displays the status of a scan – its Scan Status – while it is running:
Once a scan has finished, this column displays the number of issues detected by the scanner. Each issue type is colored according to its Vulnerability Severity Level.
|
|
Scan Policy |
This column displays the name of the policy that was used during the scan. A Scan Policy is a set of settings that determines how the scanner behaves in the Crawling and Attacking phases. For further information, view Overview of Scan Policies. |
|
Initiate Time |
This column displays the date and time the listed scan was initiated. |
|
Finish Time |
This column displayed the date and time the scan finished. |
|
Tags |
This is the label given to a scan to group and/or give additional context. |
|
Scan |
Select Scan to start a Scan. From the dropdown, you can start an Incremental Scan, a Retest or a Scheduled Scan. This button is displayed only once a scan has been completed. |
|
Report |
Select Report to view the scan results and overview. This button is displayed only once a scan has been completed. |
Viewing Recent Scans in Invicti Enterprise
How to view Recent Scans in Invicti Enterprise
- Log in to Invicti Enterprise.
- From the main menu, select Scans > Recent Scans.
How to view the scan status of a launched scan in Invicti Enterprise
- Log in to Invicti Enterprise.
- Launch a new scan (see How to Scan a Website in Invicti Enterprise).
- From the Scans menu, select Recent Scans. The Scan Status is displayed in the Result column. (It is also displayed in the Status field of the Scan Summary window.)

How to delete scan(s) on Recent Scans’ page in Invicti Enterprise
- Log in to Invicti Enterprise.
- From the main menu, select Scans > Recent Scans.
- Select scan(s) you wish to delete.
- From the Bulk drop-down menu, select Delete.
- From the Delete Confirmation dialog, select Yes to delete.
How to cancel scans on Recent Scans’ page in Invicti Enterprise
- Log in to Invicti Enterprise.
- From the main menu, select Scans > Recent Scans.
- Select scan(s) you wish to cancel.
- From the Bulk drop-down menu, select Cancel.
- From the Cancel Scan dialog, select Yes, cancel it.
How to pause scans on Recent Scans’ page in Invicti Enterprise
- Log in to Invicti Enterprise.
- From the main menu, select Scans > Recent Scans.
- Select scan(s) you wish to cancel.
- From the Bulk drop-down menu, select Pause.
- From the Pause Scan dialog, select Yes, pause it.

When its status turns into Paused, you can select Resume to restart the scan.
Filtering scans
Column Filters
All columns can be filtered, using a highly customizable combination of Fields, Operators, and Values. Each is explained below. This is useful for teams that manage the security of many websites, website groups, and scans.
Filters & Values
This table lists the Filters and Values available for the columns listed above. Select an option to filter the list by that criterion.
- In many cases, Values can be entered into the Value field; in others, the Value can be selected from a dropdown.
- You can enter more than one filter at a time.
|
Filter |
Description |
Value (Dropdown Options) |
|
Website |
Select to filter by the website Name as defined in the New Website window. |
Enter a value. |
|
Path |
Select to filter by the Path part of the Target URL. |
Enter a value. |
|
Scan Profile |
Select to filter by Scan Profile. |
Enter a value. |
|
Scan Profile Default |
Select to filter by Scan Profile Default. |
Enter a value. |
|
Result |
Select to filter by the scan status.
You can combine this filter with the Failure Reason one to narrow the results. |
The dropdown options are:
|
|
Scan Policy |
Select to filter by the Scan Policy used in the scan (see Overview of Scan Policies). |
Enter a value. |
|
Initiate Time |
Select to filter by the Initiate Time. |
Select a date from the calendar picker. |
|
Last State Changed |
Until a scan has been completed, it will pass through different Statuses. This is the last date and time the state was changed. |
Select a date from the calendar picker. |
|
Tags |
Select to filter by tags |
Enter a value. |
|
Website Groups |
Select to filter by the Website Group of the Target URL (see Website Groups). |
Enter a value. |
|
Scope |
Select to filter by the Scan Scope (see Scan Scope). |
The drop-down options are the coverage limit of the scan:
|
|
Website URL |
Select to filter by the Website URL of the scanned website. |
Enter a value. |
|
Scan Type |
Select to filter by Scan Type (see Overview of Scanning). |
The drop-down options are:
|
|
Report Policy |
Select to filter by Report Policy used in the scan (see Custom Report Policies). |
Enter a value. |
|
Duration |
Select to filter by the scan Duration. |
Enter a value. |
|
Scan Owner |
Select to filter by the Scan Owner (the user who started the scan). |
Enter a value (the Name). You cannot filter by the Scan Owner’s Email address. |
|
Failure Reason |
Select to filter by Failure Reason (why the scan has not been completed). |
The drop-down options are:
|
Operator
This table lists and explains the Operators available for filtering columns. They work in conjunction with the Field, Operator, and Value.
|
Operator |
Description |
|
Equal |
This operator can be used for exact matching. For example, if filtered by the Target URL http://www.example.com/, the filtered list of results would not also list http://api.example.com. |
|
Not Equal |
This operator can be used to exclude some results based on exactly matching. For example, if filtered by the Target URL of http://www.example.com/, the filtered list of results would exclude scans for that one. |
|
Contains |
This operator can be used to include results if the filtered column contains the value. It does not matter where the value is. For example, you could filter for the word ‘production’. |
|
Not Contains |
This operator can be used to exclude certain results on the Recent Scans page. |
|
Starts with |
This operator can be used to filter for columns that begin with the value. For example, you could filter for Website fields that begin with the ‘https://’ scheme. |
|
Ends with |
This operator can be used to filter for columns that end with the value. For example, you could filter for Website Name fields ending with ‘Staging’. |
|
Less than |
This operator can be used to filter columns that contain numeric and date-time values rather than string values. For example Initiate Time, Duration, or Finish Time. |
|
Less than or equal |
This operator can be used to filter columns that contain numeric and date-time values rather than string values. For example Initiate Time, Duration, or Finish Time. |
|
Greater than or equal |
This operator can be used to filter columns that contain numeric and date-time values rather than string values. For example Initiate Time, Duration, or Finish Time. |
|
Greater than |
This operator can be used to filter columns that contain numeric and date-time values rather than string values. For example Initiate Time, Duration, or Finish Time. |
Value
This table lists the dropdown values available for filtering columns.
|
Value |
Description |
|
7zip was not found on the agent machine |
This value can be used to filter down Recent Scans results according to Failure Reasons. As the name implies, when selected only failed scans due to 7zip being not found will be shown in the grid. |
|
Agent is unavailable |
This value can be used to filter down Recent Scans results according to Failure Reasons. As the name implies, when selected only failed scans due to agents being unavailable will be shown in the grid. |
|
An Error Occurred on Launch Scan |
This value can be used to filter down Recent Scans results according to Failure Reasons. As the name implies, when selected only failed scans due to an error during launching scan will be shown in the grid. |
|
An Error Occurred on Scan Cancel |
This value can be used to filter down Recent Scans results according to Failure Reasons. As the name implies, when selected only failed scans due to an error during canceling scan will be shown in the grid. |
|
An Error Occurred on Scan Completed |
This value can be used to filter down Recent Scans results according to Failure Reasons. As the name implies, when selected only failed scans due to an error during scan completion will be shown in the grid. |
|
An Error Occurred on Scan Failed |
This value can be used to filter down Recent Scans results according to Failure Reasons. As the name implies, when selected only failed scans due to an error during scan failure will be shown in the grid. |
|
An Error Occurred on Scan Pause |
This value can be used to filter down Recent Scans results according to Failure Reasons. As the name implies, when selected only failed scans due to an error during scan pause will be shown in the grid. |
|
Attacker Request |
This value can be used to filter down Recent Scans results according to Failure Reasons. As the name implies, when selected only failed scans due to the attacker request will be shown in the grid. |
|
Crawler Possibility |
This value can be used to filter down Recent Scans results according to Failure Reasons. As the name implies, when selected only failed scans due to the crawler possibility will be shown in the grid. |
|
Crawler Request |
This value can be used to filter down Recent Scans results according to Failure Reasons. As the name implies, when selected only failed scans due to the crawler request will be shown in the grid. |
|
Domain resolution failed |
This value can be used to filter down Recent Scans results according to Failure Reasons. As the name implies, when selected only failed scans due to domain resolution failure will be shown in the grid. |
|
Failed to Connect to Proxy |
This value can be used to filter down Recent Scans results according to Failure Reasons. As the name implies, when selected only failed scans due to failure in connection to proxy will be shown in the grid. |
|
Finished |
This value can be used to filter down Recent Scans results according to Failure Reasons. As the name implies, when selected only failed scans due to finished will be shown in the grid. |
|
Head Request |
This value can be used to filter down Recent Scans results according to Failure Reasons. As the name implies, when selected only failed scans due to the head request will be shown in the grid. |
|
Host was unavailable |
This value can be used to filter down Recent Scans results according to Failure Reasons. As the name implies, when selected only failed scans due to an unavailable host will be shown in the grid. |
|
Invalid HTTP Response Header |
This value can be used to filter down Recent Scans results according to Failure Reasons. As the name implies, when selected only failed scans due to an invalid HTTP Response Header will be shown in the grid. |
|
Link Not Found |
This value can be used to filter down Recent Scans results according to Failure Reasons. As the name implies, when selected only failed scans due to a link not found error will be shown in the grid. |
|
Login Failed |
This value can be used to filter down Recent Scans results according to Failure Reasons. As the name implies, when selected only failed scans due to the login failure will be shown in the grid. |
|
Maximum Logout Exceeded |
This value can be used to filter down Recent Scans results according to Failure Reasons. As the name implies, when selected only failed scans due to Maximum Logout Exceeded will be shown in the grid.
The maximum Logout issue occurs when the scanner loses authentication frequently and needs to log in again and again. After some attempts, the scanner decides that it is not possible to continue the scan so it stops the scan operation. |
|
OAuth2 Endpoint Error |
This value can be used to filter down Recent Scans results according to Failure Reasons. As the name implies, when selected only failed scans due to the OAuth2 Endpoint Error will be shown in the grid. |
|
Out of Disk Space |
This value can be used to filter down Recent Scans results according to Failure Reasons. As the name implies, when selected only failed scans due to the out of disk space will be shown in the grid. |
|
Phase Attack Started |
This value can be used to filter down Recent Scans results according to Failure Reasons. As the name implies, when selected only failed scans due to the phase attack started will be shown in the grid. |
|
Phase Crawl Started |
This value can be used to filter down Recent Scans results according to Failure Reasons. As the name implies, when selected only failed scans due to the phase crawl started will be shown in the grid. |
|
Phase Recrawl Started |
This value can be used to filter down Recent Scans results according to Failure Reasons. As the name implies, when selected only failed scans due to the phase recrawl started will be shown in the grid. |
|
Proxy Authentication Required |
This value can be used to filter down Recent Scans results according to Failure Reasons. As the name implies, when selected only failed scans due to the proxy authentication required will be shown in the grid. |
|
Recrawler Request |
This value can be used to filter down Recent Scans results according to Failure Reasons. As the name implies, when selected only failed scans due to the recrawler request will be shown in the grid. |
|
Recalculate Attack Possibilities |
This value can be used to filter down Recent Scans results according to Failure Reasons. As the name implies, when selected only failed scans due to the recalculate attack possibilities will be shown in the grid. |
|
Redirect detected |
This value can be used to filter down Recent Scans results according to Failure Reasons. As the name implies, when selected only failed scans due to the redirect detected will be shown in the grid. |
|
Request |
This value can be used to filter down Recent Scans results according to Failure Reasons. As the name implies, when selected only failed scans due to the request will be shown in the grid. |
|
Request Failed |
This value can be used to filter down Recent Scans results according to Failure Reasons. As the name implies, when selected only failed scans due to the request failed will be shown in the grid. |
|
Response |
This value can be used to filter down Recent Scans results according to Failure Reasons. As the name implies, when selected only failed scans due to the response will be shown in the grid. |
|
Report Policy Not Found |
This value can be used to filter down Recent Scans results according to Failure Reasons. As the name implies, when selected only failed scans due to not finding report policy will be shown in the grid. |
|
Scan Policy Not Found |
This value can be used to filter down Recent Scans results according to Failure Reasons. As the name implies, when selected only failed scans due to not finding scan policy will be shown in the grid. |
|
Scan Target Not Reachable |
This value can be used to filter down Recent Scans results according to Failure Reasons. As the name implies, when selected only failed scans due to inability to reach the scan target will be shown in the grid. |
|
Target Link Timeout |
This value can be used to filter down Recent Scans results according to Failure Reasons. As the name implies, when selected only failed scans due to the target link timeout will be shown in the grid. |
|
The Scan Is Not Allowed |
This value can be used to filter down Recent Scans results according to Failure Reasons. As the name implies, when selected only failed scans due to The Scan is Not Allowed. Allowance is decided if the target IP address or resolved IP address of the target is in the accepted range. |
|
The SSL connection could not be established |
This value can be used to filter down Recent Scans results according to Failure Reasons. As the name implies, when selected only failed scans due to inability to establish the SSL connection will be shown. |
|
Timeout Detected |
This value can be used to filter down Recent Scans results according to Failure Reasons. As the name implies, when selected only failed scans due to detecting timeout will be shown. |
|
Unable to find scan files |
This value can be used to filter down Recent Scans results according to Failure Reasons. As the name implies, when selected only failed scans due to failure to find the scan files will be shown in the grid. This option only applies for Retest and Incremental Scans. |
|
Unable to load scan session |
This value can be used to filter down Recent Scans results according to Failure Reasons. As the name implies, when selected only failed scans due to unable to load scan session will be shown in the grid. This option only applies for Retest and Incremental Scans. |
How to filter scans in Invicti Enterprise
- From the main menu, select Scans> Recent Scans.
- From the Recent Scans page, select the filter button (
 ) next to any header column.
 - Select Clear to clear all fields.
- Add a New Filter.
- In the relevant filter, where relevant:
- From the Field drop-down, select an option.
- From the Operator drop-down, select an option.
- In the Value field, enter a value.
- Select Apply.
Viewing Recent Scans in Invicti Standard
How to view Recent Scans in Invicti Standard
- Open Invicti Standard.
- From the ribbon, select the File tab. The Local Scans list is displayed.
- Use the Filter and Sort features to view as required.
How to delete Scans from Local Scan File Filters in Invicti Standard
- Open Invicti Standard.
- From the ribbon, select the File tab. The local Scans list is displayed.
- Move your cursor over the scan you want to delete. An X is displayed in the top right corner.

- Select the X. The Delete Scan dialog is displayed.
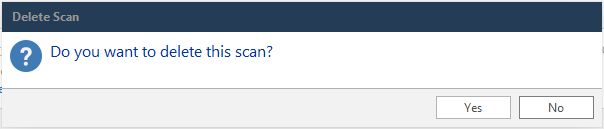
- Select Yes.